When fierce winds and rain hit your house, your roof takes the biggest hit. Storm damage can make your home leaky and weak. It’s important for homeowners to know how weather can harm their roofs. This guide will show you how to spot problems and act fast after a storm.
After a storm, checking your roof is crucial. Look for missing shingles and hidden water damage. Knowing what to look for can prevent expensive fixes later. We’ll show you how to check for storm damage and keep your roof safe.
Understanding Storm-Related Roof Damage Types
Storms can cause a lot of damage to your roof. It’s important to know the different types of damage. This helps you understand what needs to be fixed.
Wind Damage and Its Effects on Roofing
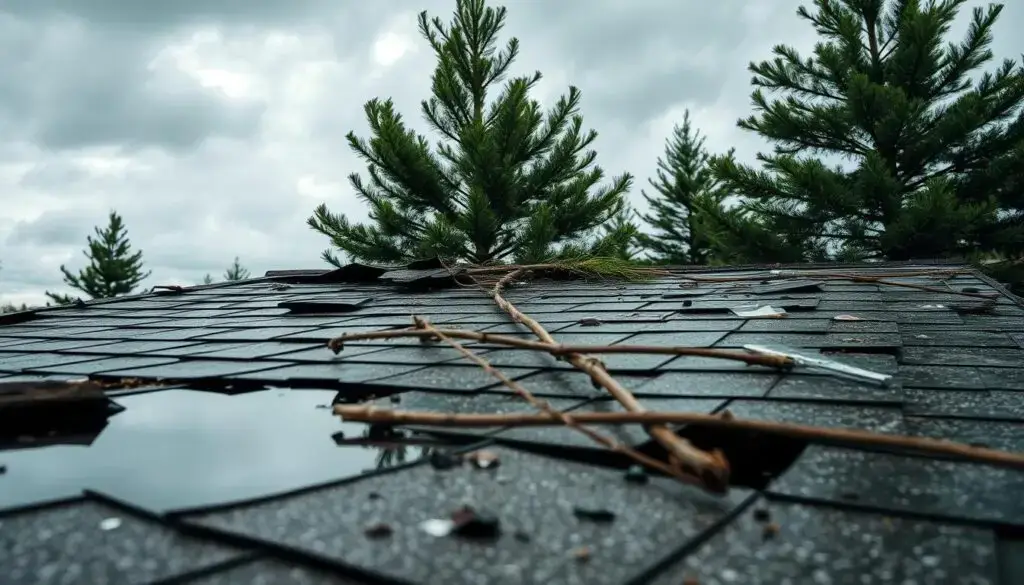
Strong winds can lift and tear off shingles. This exposes the underlayment of your roof. The damage often starts at the edges and spreads quickly. After a windstorm, look for missing or curled shingles.
Hail Impact on Different Roofing Materials
Hail damage depends on your roofing material. Asphalt shingles might get dented or lose granules. Metal roofs can get dimples, and wood shakes might split.
Clay tiles can crack from hail impact. It’s crucial to check your roof for these signs after a hail storm.
| Roofing Material | Hail Damage Signs |
|---|---|
| Asphalt Shingles | Dents, granule loss |
| Metal | Dimples, dents |
| Wood Shakes | Splits, cracks |
| Clay Tiles | Cracks, chips |
Water Damage and Leak Patterns
Heavy rains can cause water leaks, especially if your roof is damaged. Water leaks often appear far from where the damage is. Check your attic and ceilings for water stains or mold.
- Look for discolored spots on ceilings
- Check for damp insulation in the attic
- Inspect walls for peeling paint or bubbling
Immediate Steps to Take After Storm Damage
When a storm hits, acting fast is key. First, make sure your family is safe. After the storm, check your home for damage. Look for fallen trees, broken windows, or loose shingles. Don’t climb on your roof yet.
Then, start emergency roof repairs to stop more damage. Use tarps or plastic to cover holes. Use strong tape or nails to keep them in place. These are just temporary fixes until the pros come.
Next, document all damage well. Take clear photos and videos of the damage. This proof is crucial for insurance claims. Also, list damaged items and structural problems you see.
- Contact your insurance company right away
- Call a professional roofing contractor for a check-up
- Save receipts for any emergency fixes or temporary housing
Don’t try DIY fixes beyond simple protections. Roofers have the skills and tools to safely fix storm damage. They can give a detailed check and lasting fixes.
| Quick Fix | Purpose | Materials Needed |
|---|---|---|
| Tarp covering | Prevent water intrusion | Heavy-duty tarp, nails, rope |
| Debris removal | Reduce weight on roof | Gloves, rake, garbage bags |
| Gutter cleaning | Ensure proper drainage | Ladder, bucket, scoop |
Your safety is the most important thing. If you’re not sure about any repair, wait for the experts. Quick action and good documentation help a lot in recovering from a storm.
How to Spot Signs of Roof Damage After a Storm
It’s important to check your roof after a storm to keep your home safe. A detailed roof inspection can find hidden damage. We’ll show you how to look for storm damage inside and outside your home.
External Signs of Damage
Begin by looking at your roof from the ground. Look for missing or damaged shingles, dented gutters, or debris. Use binoculars for a closer look without danger.
Focus on the roof’s edges and corners. These spots are often hit hard by wind.
Interior Warning Signs
Inside, watch for water stains on ceilings or walls. These could mean roof leaks. Also, check for peeling paint or wallpaper, which might show moisture issues.
Don’t overlook your windows. Look for signs of water getting in.
Checking Your Attic Space
Checking your attic is key to finding hidden roof damage. Go into your attic during the day and look for:
- Sunlight peeking through the roof boards
- Wet insulation or wood
- Sagging in the roof deck
These signs mean you need to get help right away.
Always put safety first when inspecting your roof. If you’re not sure or feel uneasy, call a professional roofer. They can spot and fix storm damage on your roof.
Common Areas Prone to Storm Damage
Knowing which parts of your roof are most at risk is key for homeowners. Storms can cause a lot of damage to your roof, leading to expensive repairs. Let’s look at the areas most likely to be hit by nature’s power.
Shingle Vulnerability Points
Shingles are often the first to face storm damage. High winds can pull them off, and hail can crack or dent them. The edges and corners of your roof are especially vulnerable. Regular checks can help find problems before they get worse.

Flashing and Valley Areas
Severe weather can cause flashing issues. These metal strips, which seal around chimneys and vents, can loosen or crack. Roof valleys, where two slopes meet, are also at risk for water and debris buildup, leading to leaks.
Chimney and Vent Damage
Chimneys and vents are not safe from storm damage. Strong winds can knock off chimney caps or harm vent pipes. After a storm, check these areas to stop water leaks and keep air flowing.
- Check for loose or missing shingles
- Examine flashing for signs of damage
- Look for debris in roof valleys
- Inspect chimney and vent integrity
By paying attention to these weak spots, you can catch problems early. This helps protect your home from more damage.
Safety Precautions During Roof Inspection
Roof safety is key when you’re inspecting. Your safety is the top priority. Before you climb up, check the weather first. Stay away from inspections in the rain, strong winds, or extreme heat.
Having the right equipment is vital for staying safe. Make sure your ladder is sturdy and reaches at least three feet above the roof. Always keep three points of contact on the ladder. Wear shoes with good grip to avoid slipping on steep roofs.
For very steep or high roofs, a safety harness is a must. It’s a lifesaver. Make sure it’s securely tied to a strong roof point. If you’re not sure how to use it, it’s safer to call a pro.
“Never compromise on safety when inspecting your roof. It’s better to err on the side of caution than risk injury.”
Here’s a quick list of must-have roof inspection gear:
- Sturdy ladder
- Non-slip shoes
- Safety harness
- Binoculars (for distant viewing)
- Flashlight
- Protective gloves
If you feel unsure or unsafe during the inspection, call a professional roofing contractor. They have the skills and tools for safe inspections.
Professional Assessment vs. DIY Inspection
When a storm hits, you can choose to call roofing experts or do it yourself. Each choice depends on the damage and how comfortable you are with fixing things at home.
When to Call a Professional
For serious damage or tricky problems, get a pro. Look out for many missing shingles, big leaks, or structural issues. Experts have the right tools and know-how to handle these big jobs safely.
DIY Inspection Checklist
For small problems or regular checks, you can do it yourself. Here’s a quick guide:
- Check for visible damage from the ground
- Look for loose or missing shingles
- Inspect gutters for granules
- Check attic for signs of leaks
- Look for damaged flashing around chimneys and vents

Tools Needed for Basic Assessment
Having the right tools makes your DIY roof check better. You’ll need:
| Tool | Purpose |
|---|---|
| Binoculars | Safely view roof from ground level |
| Flashlight | Illuminate dark areas in attic |
| Ladder | Access roof for closer inspection |
| Camera | Document any damage found |
| Measuring tape | Estimate size of damaged areas |
Always put safety first. If you’re not sure about anything, it’s best to call roofing experts for help.
Documentation for Insurance Claims
When your roof gets damaged in a storm, it’s key to document everything well for your insurance claim. You’ll need to take clear photos, collect important papers, and know when to file your claim.
Taking Proper Photos
Take photos of all roof damage you can see. Get close-ups of the bad spots and wide shots to show how big the damage is. Also, snap pictures of any debris on the ground and any damage inside from leaks. Good lighting is important for clear photos.
Required Documentation
Make a complete file for your insurance claim. You should include:
- A detailed list of what’s damaged
- Repair estimates from licensed contractors
- Receipts for any emergency fixes
- A copy of your insurance policy
- A police report if needed
Timeline for Filing Claims
Don’t wait to file your insurance claim for storm damage. Most policies have a time limit for reporting damage. Here’s a basic timeline:
| Action | Timeframe |
|---|---|
| Initial damage report | Within 24-48 hours |
| Detailed claim submission | Within 2 weeks |
| Insurance adjuster visit | Within 1-2 weeks of claim |
| Claim resolution | 30-60 days (varies by insurer) |
Act fast and do your claim filing right to get approved. Keep all your documents safe and talk openly with your insurance company as you go.
Emergency Temporary Repairs
When a storm damages your roof, you must act fast. Emergency repair kits can be a big help. They offer temporary fixes to stop water from getting in. These kits usually have tarps, roofing cement, and plastic sheeting.
First, cover big holes with a tarp. Make sure it’s tight to keep water out. For small leaks, use roofing cement to seal them up. Remember, these fixes are only temporary until a pro can fix it for good.
Here’s what you need for your emergency roof repair kit:
- Heavy-duty tarp
- Roofing nails
- Hammer
- Roofing cement
- Plastic sheeting
- Utility knife
- Safety gear (gloves, goggles)
For shingle damage, use roofing cement to fix loose shingles. Put a thick layer under the shingle and press hard. This fix can protect your roof until a real repair is done.
“Always prioritize safety when attempting emergency repairs. If you’re unsure or the damage is extensive, wait for professional help.”
Remember, these quick fixes are not meant to last. They’re just to keep damage down while you wait for a pro to check and fix your roof. Always get a full inspection as soon as you can after using these temporary fixes.
| Emergency Repair Method | Best For | Duration |
|---|---|---|
| Tarp covering | Large holes or extensive damage | Up to 90 days |
| Roofing cement | Small leaks and loose shingles | 30-60 days |
| Plastic sheeting | Temporary moisture barrier | 7-14 days |
Long-term Solutions and Prevention
To keep your roof safe from storms, you need to act early. Long-term plans can lower damage risks and make your roof last longer.
Reinforcement Options
Roof reinforcement is key for fighting off harsh weather. Adding hurricane straps or clips can tie your roof to the house frame. A secondary water barrier under your shingles helps block leaks.
Regular Maintenance Tips
Keeping your roof in good shape is essential. Clean your gutters and downspouts often to avoid water problems. Cut back tree branches to prevent damage from falling debris. Get a yearly check-up from a pro to fix small issues before they get big.
Storm-Resistant Materials
Choosing the right roofing materials can save you money in the long run. Metal roofs are tough and can handle strong winds. Shingles that can take a hit from hail are also a good choice. Clay or concrete tiles are the best for fighting off high winds and heavy rain.
| Material | Wind Resistance | Hail Resistance | Lifespan |
|---|---|---|---|
| Metal | Up to 160 mph | High | 40-70 years |
| Impact-Resistant Shingles | Up to 130 mph | Very High | 30-50 years |
| Clay/Concrete Tiles | Up to 150 mph | High | 50+ years |
Using these methods together can make your roof strong against storms. This way, your roof will stay safe and effective for many years.
Cost Considerations and Insurance Coverage
Dealing with roof repair costs after a storm can be stressful. It’s important to understand your insurance coverage and deductibles. This helps manage expenses. Let’s look at the financial side of storm-related roof repairs.
Average Repair Costs
Roof repair costs vary a lot. This depends on how bad the damage is and the materials used. Minor repairs might cost a few hundred dollars. But, extensive damage could cost thousands.
Here’s a general price range:
| Repair Type | Average Cost Range |
|---|---|
| Shingle replacement | $300 – $1,500 |
| Leak repair | $400 – $1,000 |
| Full roof replacement | $5,000 – $15,000+ |
Insurance Policy Understanding
Your homeowner’s insurance might cover storm damage. But, policies can be different. Check your coverage limits and what’s not covered. Some policies cover the full cost of replacement, while others pay the actual cash value.
Deductible Considerations
Deductibles affect how much you pay out of pocket for repairs. Higher deductibles mean lower premiums but more upfront costs. Think about your financial situation when choosing a deductible.
Some policies have different deductibles for wind and hail damage. So, it’s important to read the fine print.
Act quickly and document everything well to get the most from your insurance claim. Also, get quotes from trusted contractors to make sure you’re getting a fair price for your repairs.
Conclusion
Your roof protects your home from storms. Spotting and fixing damage early can save you money. Keeping your roof in good shape is crucial.
After a storm, check your home for damage right away. Look for signs inside and outside. If you’re not sure, call a professional for help.
Home maintenance is about preventing problems, not just fixing them. Use storm-resistant materials and get regular roof checks. This way, your roof will be ready for any weather.
Also, know your insurance policy well and keep records. This helps a lot if you need to file a claim. With the right steps, your roof and home will stay safe for many years.
FAQ
How quickly should I inspect my roof after a storm?
Check your roof as soon as it’s safe after a storm. Try to do it within 24-48 hours. Quick checks can stop more damage and help with temporary fixes.
What are the most common signs of storm damage on a roof?
Look for missing or damaged shingles, dented metal, and granules in gutters. Also, check for water stains on ceilings and leaks. Always inspect after severe weather.
Can I inspect my roof myself, or should I hire a professional?
You can do a basic check from the ground. But, for a detailed look, especially if damage is big or your roof is steep, get a pro.
What should I do if I find roof damage after a storm?
First, take photos and videos of the damage. Then, try to fix it temporarily to avoid more harm. Next, call your insurance and a trusted roofer for a proper check and fix.
How long do I have to file an insurance claim for storm damage?
The time to file varies by policy and state. It’s best to do it as soon as you can, usually within 30-60 days. Check your policy for the exact time.
What kind of documentation do I need for an insurance claim?
You’ll need clear photos and videos of the damage, a pro’s report, repair quotes, and any receipts for fixes. Keep a record of all talks with your insurance and contractors.
Are there any DIY temporary repairs I can make after storm damage?
Yes, you can use tarps for damaged spots, roofing cement for small leaks, or replace a few shingles. But, these are just temporary fixes. Get a pro to fix it for good soon.
How can I prepare my roof for future storms?
Keep up with maintenance. Clean gutters, trim branches, fix shingles fast, and think about impact-resistant materials. Also, get your roof checked by pros every year.
What areas of the roof are most vulnerable to storm damage?
The edges, corners, spots around chimneys and vents, and valleys are most at risk. Focus on these areas when you inspect.
How do different roofing materials hold up in storms?
Materials vary in durability. Asphalt shingles can get damaged by hail and wind. Metal is good against wind but can dent. Tile and slate are tough but can crack. Choose based on your area’s weather.